Free Resources
![]()

Assistive Technology Resources
 |
 |
 |
 |
 |
X-keys and Y-mouse devices open a wide range of possibilities to computer users of all abilities and skill levels. Here we present tips and tutorials for the AT professional and home user alike.
- Jump to:
- Programming Mouse Functions with Macro Works
- Programming Mouse Functions with USB X-keys
- Programming Mouse Functions with PS/2 X-keys
- Launching Programs with an X-keys
- Using the X-keys Foot Pedal to read Music
- How to make Your own switches tutorial
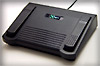
How to Program Mouse Buttons on an X-keys Foot Pedal or Switch Interface
X-keys SE USB Foot pedals and Switch Interfaces have two ways of performing the mouse click function in Windows Operating Systems.
Using X-keys Macro Works Software

Installing the X-keys Macro Works Software which comes with your X-keys SE and selecting the proper device in Macro Maker will lead you to the easiest way to program the pedals or ports on your X-keys. Each pedal or port may be assigned left, center, right, or double-click by Macro Maker. Click on the link above for full instructions on how to use Macro Works.
A version of Macro Works for Mac OS-X is also available.
Using X-keys Macro Recorder Software
If your X-keys is frequently moved from computer to computer, or if you need to use it on an Operating System other than Windows or Mac OS-X, we offer an alternative mode of operation which we call Memory Resident Mode. This allows you to program the X-keys on a Windows OS computer, and move it to any other computer that supports USB Keyboard and Mouse.
-
To program a mouse button on an X-keys USB Foot pedal
- Carefully pry up on the center pedal and move the Programming switch to the right (programming position)
- Press and release the pedal you wish to program
- Press and hold the “Esc” key
- Press and hold the “B” key
- Press and release the “1” key (above the “Q” key -- not on the num pad)
- Release the “B” key
- Release the “Esc” key
- Press and release the pedal you are programming
- Flip the programming switch back to the left (or press another pedal to program)
To program a secondary (right) mouse button, follow the same procedure, and use the “2” key in step 5. For a center mouse button, use the “3” key in step 5.
When you are finished programming, leave the programming switch in operating position (left). The Foot Pedal may now be unplugged or moved to another machine. It will identify itself as a mouse and the pedals will act just like mouse buttons.
It is also possible to have a pedal with keystrokes and a pedal with a mouse button programmed on the same X-keys.
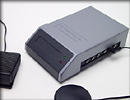
The X-keys USB Switch Interface may be programmed in the same manner, using a switch, Buddy Button, or Treadle Pedal.
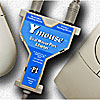
Using Windows Accessibility Option to Send a Mouse Click
X-keys PS/2 devices can be programmed to trigger a mouse click in conjunction with Windows Accessibility Options. Click here to get our tutorial: wamouse.pdf
Launching Programs in Windows
Here are two proven methods for launching Windows applications from your X-keys.
Create a Shortcut Key
- On your Windows Desktop, Right Click on the program's icon.
- Select the “Properties” option.
- Click on the “Shortcut” tab.
- Click in the “Shortcut Key” window.
- Type a single key on your keyboard.
- Click the “OK” button.
Note that Windows adds the Ctrl+Alt combination to your key selection. The key combination Ctrl+Alt+(your key) can now be programmed into the X-keys to launch the application.
Use Windows “Run” Command

Program your X-keys to send the “WinKey+R” combination to open Windows Run command, followed by the name of the application you want to launch. For example, “WinKey+R iexplore ENTER” will launch Internet Explorer. For greater reliability, insert a pause between the “WinKey+R” combination and the file name to allow the run command window to open.
To insert a pause in Macro Maker, select the key, select Create/Edit Macro, click on the line of the macro before you want the pause (for example on the “r[up]” line) and click on the “Insert Pause” button. A 0.5 second pause is inserted, but you may adjust the length of the pause by clicking on the pause code and using the “delay”setting.
To insert a pause with an X-keys PS/2 device or an X-keys USB device in Memory Resident Mode, use the Special Programming combination “Esc+5” as you are programming the key sequence. A 0.5 second pause is inserted each time the combination is entered.
Make Your Own Switches

This step by step tutorial walks you through wiring a custom switch for our X-keys USB Switch Interface. You could do the same procedure (substitute a 1N4148 signal diode for the plug) to make 128 of these for our X-keys USB Matrix Board.
-
Ingredients:
- 1 - Jameco switch #155379 $.39@ (www.jameco.com)
- 2 - AOL CDs (1000 hr. recommended)
- 1 - obsolete power supply with 3.5mm mono plug (or Jameco #101151 and wire)
- 1 - small tube silicone sealant
-
Tools:
- Soldering iron
- Wire stripper
- Large paper clip
-
Directions:
- Clip the cord from the power supply and throw away the transformer.
- Strip 3/16” of insulation from the remaining two wires.
- Solder the wires to two terminals side by side on the switch.
- Apply a generous dollop of silicon to opposite ends of one CD.
- Position the switch in one glob, wires facing out.
- Lay the second CD on top of the first with the switch sandwiched between the two.
- Slide the paper clip over the end opposite the switch to hold everything in place.
- Adjust the position of the switch so that it sets parallel to the top CD.
- Set aside for four hours to allow silicone to set up.
Result: It's certainly not as durable as a Buddy Button, but it does the same job when plugged into our USB Switch Interface. Pressing anywhere on the top half of the CD activates the switch. We recommend programming it to launch AOL.
How to Turn Pages of Sheet Music with an X-keys Foot Pedal
In this article Tom Green tells how he used our X-keys Foot Pedal to navigate the enlarged sheet music displayed by his laptop system. Read Tom’s story on the blindmusicstudent.org web site
Accessories | Developer´s Corner | Resources | Support
Shopping Cart | Checkout | Privacy Policy | Site Map
X-keys, Y-mouse, RailDriver and The No Slogan Company are Trademarks of P.I. Engineering, Inc.
Copyright © 2006 P.I. Engineering, Inc. All Rights Reserved.
101 Innovation Parkway
Williamston, MI U.S.A. 48895
1-517-655-5523
FAX: 1-517-655-4926
www.piengineering.com | www.xkeys.com | www.ymouse.com | www.raildriver.com
Visit Our New Divisions:
![]()
![]()